Monday, February 28

{ Spring Party Week } - Let's Go Fly a Kite!

"Let's go fly a kite, up to the highest height...... "

Doesn't that little tune bring back some great memories? Playing in the grass, singing and dancing without a care in the world. Well, that's exactly the idea behind one of my favorite party tables of all time from Tracey Lau. This one is pure perfection. Absolutely stunning.

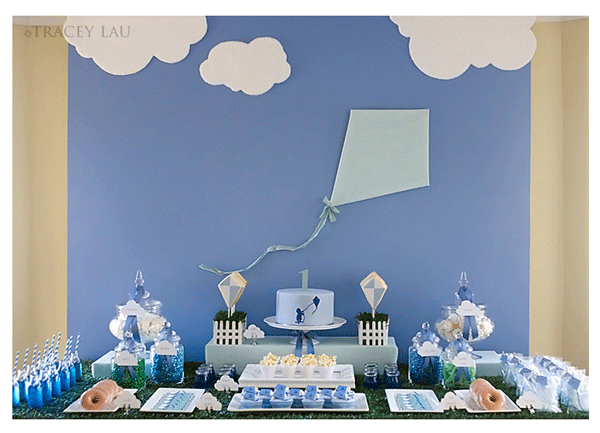
Australian based Tracey Lau, a mother, event planner and photographer, created this unforgettable display for her son's 1st birthday celebration. Tracey's attention to detail is amazing, her style.... impeccable. About her party Tracey says, "So to the Kite Party, what was I thinking - I started with Blue sky and lush green grass, added in outdoors flying kites, and outdoors in the park takes me to gingham, throw in some yummy treats and this is what I ended up with…Jeremiah’s Dessert Table!"

Photobucket

Tracey's backdrop says it all..... carefree, fun, simple. Genius, I think.
It makes you just want to jump right into this gorgeous Spring day.


Photobucket
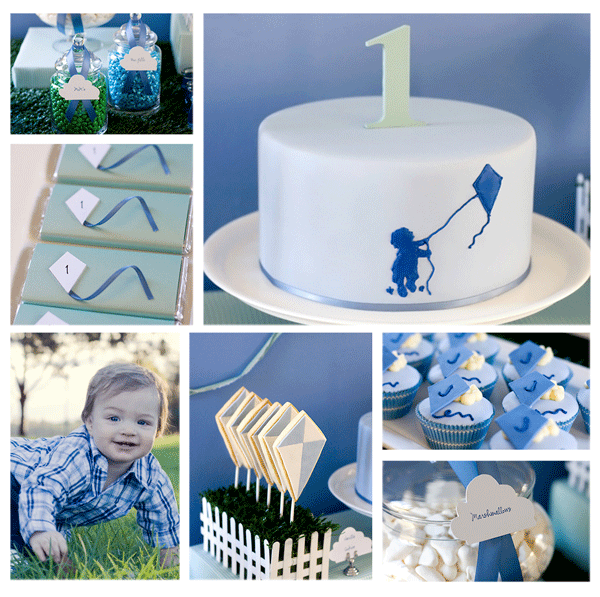
Just take a close look at some of Tracey's details: colorful candies in jars, candy bar favors wrapped in paper and embellished with a paper kite and ribbon, fondant kite cupcakes
with cloud icing, sweet kite cookies on sticks in the perfect white picket fence container,
and of course, those adorable cloud marshmallows (Tracey purchased these in Australia, but I found a great tutorial on the web if you'd like to make your own).

It's so cute, I can barely stand it!


Photobucket
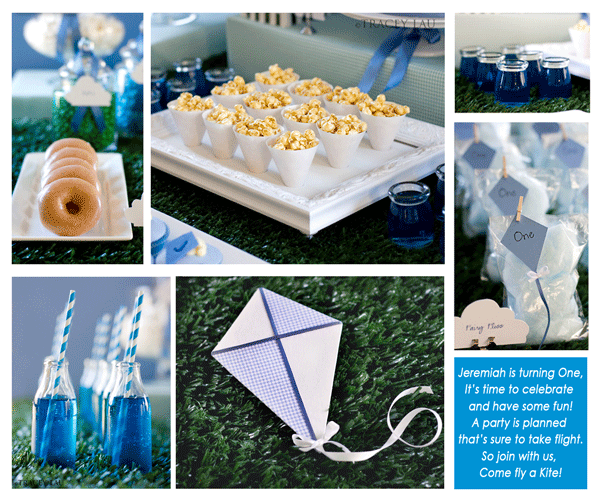
The artificial grass as a tablecloth is such a nice touch. It really conveys that "running in the park" feel of the table. I love Tracey's use of a white frame to hold her caramel corn cones, too. About the frame project she says, "(My husband) replaced the glass, etc.
with MDF for me and drilled 12 holes. We then gave it another coat of
white paint so it all worked and added in legs."

And just look at those cloud food labels - So sweet! Bags of cotton candy as "fairy floss"
and drinks in the perfect sky blue color with those popular striped straws
round out this beautiful dessert table.

Tracey also made the kite invitations with scrapbook paper and some ribbon and included the wording for the invite on the back. Wouldn't every child love to get this invitation in the mail!

She says, "We couldn’t be happier with how the day turned out, and I must say Jeremiah enjoyed himself, especially his first ever taste of cake. I think he is hooked."

How wonderful!
Hard work pays off in a fabulous party to celebrate little Jeremiah's milestone birthday.
Be sure to visit Tracey's amazing website for more details.


Credits:

Bottles – Santa Vittoria nectar bottles available from Woolworths (Australia)
Straws – Find these at
Jars and Jelly pots - from Tracey's collection
Candy bars – Cadbury Furry Friends that I wrapped - Woolworths (Australia)
Cloud marshmallows - Coles (Australia)
Doughnuts - Krispy Kreme
Cake, cupcakes, meringue and cookies - homemade

Photobucket

Saturday, February 26

{ Paper Crafting Week } - Paper Rose Pomander Pinata


I just couldn't stop with 5 posts for my Paper Crafting Week -- I had to add one more in! This is such a great idea, and just simply gorgeous, that I had to include it as well.

Nicole of Tradewinds Tiaras has a brilliant idea for a homemade party pinata using paper roses. Yes, that beautiful pomander is filled with treats and goodies and, well, yes, it's about to be beaten to death by many little sugar-starved children. But it's pretty, right?

If you have the heart to create something this beautiful and then have it completely destroyed by little ones, Nicole has a wonderful tutorial on Kate Landers Events.

Nicole actually used a 24" round balloon and made a paper machie pinata herself out of newspaper and glue, but I think I would go buy a soccer or baseball pinata to make the 1st step a little quicker. Then she proceeded to make about 300 tissue paper roses to cover the ball shaped base. Here are her supplies for the roses.


Nicole uses a stapler to hold the rose together. How simple!


And the 300 roses before they were attached to the paper mache ball with hot glue.

Nicole made this pinata at her Cornish Fairy party for her daughter. This party is a STUNNER - you must go see all the details on Nicole's blog. Just take a look at her dessert table display.


And the tiered fondant cake she made.... yes, she MADE it!


What a pretty backdrop, too.


And a favorite, the sucker "topiaries" - she shows us how to make these as well.


And her sweet fabric mushrooms springing up all over the woods.


Nicole has so many amazing ideas. Be sure to visit Tradewind Tiaras for more
gorgeous photos and fabulous fairy party inspiration.

I hope you have a wonderful Saturday!
Photobucket

Friday, February 25

Paper Crafting Week - Part 5: Party Hats


For the last day of my week-long paper crafting round up,
I wanted to show these fabulous ideas for Custom Party Hats.
Isn't this the most adorable thing? Doesn't it make you want to say, "Why didn't I think of that?"
Every little girl would feel like a princess with her very own, made-just-for-her party hat.

The fabulously creative mind of Lil' Luna deserves the credit for this one. She has a tutorial on Oopsey Daisy that shows all of us how easy it is to create a one of a kind party hat using pre-made hats and a few embellishments. Here are the basics:


Step One: Gather your materials including circular stickers such as vinyl dots or
scrapbook paper dots or even office supply colored circles, some pre-made party hats,
crepe paper, glitter, glue, hot glue, etc.


Step Two: Add the circular stickers to your party hats.


Step Three: Ruffle your crepe paper fringe with a sewing machine.


Step Four: Add some fringe to the top of your hat as well.


Step 5: Make a paper rosette from scrapbook paper.


Step 6: Add a glittery birthday girl number and that's it! Ca-ute!!


Birthday Girl has another tutorial for a simplified version of a party hat.
She uses 12"x12" scrapbook paper for the hats which is perfect for matching any party theme.


This one involves a little sewing like the first example, but if you don't have a machine, I think you could cut the crepe paper into fringe and glue a few layers to the bottom of the hat, too.


Materials: 12x12 scrapbook paper, cone hat for a pattern,
1 roll of crepe paper, double-sided tape and elastic cord.

She shows us how tocut a pattern for the hat, and then ruffle and fringe the crepe paper edge.


Just a few simple steps to fabulous!


And before I go, I had to show another adorable version by Art Glitter Blog.
This one has me swooningand wishing my girls were little again.
Can you believe how cute this is?

What a fabulous week of ideas! I'm so inspired now to go into the weekend
and craft with paper -- I hope you are, too. Happy Friday Everyone!

Photobucket

Thursday, February 24

Paper Crafting Week - Part 4: Paper Garlands

We've all probably used those rolls of crepe paper to quickly decorate for a party, but did you know how versatile they can be? Gather them up with a sewing machine to make a sweet ruffle, twist them around and around to make fabulous flowers, or snip them with scissors and create a unique garland.... the possibilities are many. Just take a look at some of the amazing ideas I've found around the web.....


Ruffled party streamers by How Does She using two layers
of crepe paper and a simple machine stitch.


If you aren't into sewing, you could try this great idea from Oh Happy Day .
It's a no-sew version of party streamers.
Just follow her simple directions below or visit her blog for a step-by-step tutorial.


Grab a good pair of scissors and in no time at all,
you can have these unique party decorations. Soooo easy!


The Gaines Gang shows us how to make another version of a simple,
no-sew crepe paper garland, this one with two layers.


If you don't have time to make a garland yourself, you can always visit Etsy and buy some pre-made. Great shops like Julie Collings have many beautiful ruffled designs to choose from.


And Bake it Pretty sells this tissue paper fringe in a few colorways as well.


If you want something perfect for a spring party, be sure to check out this
easy tutorial from Prudent Baby for a flower shaped tissue paper garland.

I am so inspired! I hope these ideas have brought you some creative inspiration, too.

Photobucket

Wednesday, February 23

Paper Crafting Week - Part 3: Paper Flower Decorations

I hope you are loving all the paper crafting ideas this week. There are so many great photos and tutorials, I could actually keep going longer than a week. I get such a thrill from discovering these talented women and their amazing creations. On day three, I'm focusing on paper flowers and how versatile they are as decorations on favors and gifts to stunning party garlands.

We've all seen the tissue paper poms hanging over gorgeous party tables. A simple idea brought back from those 70's style paper flowers I couldn't wait to win at the county fair (yes, I was the goofy kid walking around the fair with an enormous colored flower on a stick!), paper poms have made a comeback in quite a stylish way. They seem to be everywhere on the party scene these days.

The popularity of those poms have led lots of ladies to come up with some really creative ways to use tissue paper and crepe paper to make some truly special party embellishments. Just take a look at one of my favorites.....

Aren't these divine? Pinky Lou Lou Party Girl makes "party blooms" party favors from crepe paper, glitter and a few small accessories.

Aren't they so original and adorable?
What little girl wouldn't love hand these out at her birthday celebration!


Another version of the crepe paper rosette is pictured here from Once Wed.
These were actually place cards for wedding tables, but wouldn't they be a special treat
for a birthday girl with a glittered number of her age in the center?
Or what about making these for prize ribbons to give out to winners of party games?
Love this idea!


Icing Designs shares a tutorial on these super easy tissue paper rosettes
using a single sheet of tissue paper twisted and molded into a large rose. They show us how to make everything from gift toppers to wall hangings to garlands using their simple technique.


Dana Made It makes these divine magnolia blooms from paper napkins.
Pretty realistic, I think. Be sure to check out her website for a full tutorial.

Look how beautiful they are as a garland. These would be lovely for a baby shower
or wedding shower, or even to decorate a little girl's bedroom.


This idea from Today's Fabulous Finds is actually a Valentine's box
for a child to hold her Valentine's cards in, but I just love her idea of
making the flowers from gathered crepe paper streamers.


This sweet flower favor box is made from stamped tissue paper and button embellishments. My Time, My Creations, My Stampendence has a video on their
website of the step-by-step process.


Zakka Life shows us how to make miniature versions of paper flowers which are wonderful to use in bouquets or to decorate gift boxes and favor boxes such as the one below.


Martha Stewart crafts makes a very sweet favor box with a miniature tissue flower.
You can find a great tutorial on creating these flowers at 36th Street Events.


Made by Nicole shares a tutorial on how to make these adorable crepe paper ornaments,
but I'm thinking they would make perfect party accessories as well.


And a similar idea is shared by Little Shabby Shack.


And Obsessed with Cupcakes has an easy tutorial on making these
decorative flower cupcake wraps with crepe paper.


Isn't it sweet with a cupcake inside and a ribbon to dress it up a bit?
These would be so adorable at a little girl's garden or fairy birthday party or even
filled with candy or other goodies and given as a party favor.

I hope you all enjoyed these inspiring ideas --
I've got some awesome ideas for crepe paper garlands tomorrow so stay tuned!

Photobucket